This topic is all about “How to plunge a toilet?” why? Because many people don’t think twice about using the toilet for weeks, months, or even years. Toilets are the least attentive thing in our home as well as important but we never give attention to them until and unless it starts clogging. The instant it clogs, however, the toilet becomes the center of attention. While most homeowners are wise enough to keep a plunger somewhere in the house—if not in the bathroom itself, then perhaps in the linen closet or basement—a remarkable proportion don’t actually know how to plunge a toilet with a plunger. The correct technique is easy to master. Certainly, practice makes perfect, but just about anyone can capably handle the task. But before hopping to the methods to unclog a toilet on your own with a toilet plunger. You are required to know a few important things and the techniques to use that in a proper way. So, let’s get started
Things To Know Before Acknowledging “How To Plunge A Toilet?”
When you start, be certain you have the appropriate plunger for the task. There are numerous sorts of plungers for various types of sewage fittings, trust me or not. A cup plunger, often known as a sink plunger, is by far the most simple kind. It features a flat base and a roof-shaped rubber top. Since the flat bottom provides a seal all around a relatively level sink or tub bowl, this kind is excellent for basins and tubs.
A toilet plunger, also known as a flange plunger, is the correct instrument for plunging a toilet. The cup on this is taller than the bowl on a sink plunger, and has a handle-like projection on the base of the cup, called the flange. For a proper seal, the flange fits into the hole of your toilet bowl. The edge of the plunger may also compress into the cup, allowing it to be used in the basins/sink and bathtubs. A cup plunger is ineffective in removing toilet blockages, therefore you’ll need a flange plunger for this job.
How To Plunge a Toilet to Unclog It Easily?
There are 6 different methods to unclog a toilet, some use the plunger and some don’t. But all of them are effective. Some of them are related to DIY techniques. Use any one or all of them until your toilet gets unclogged. Every method has some tools and materials that conclude the method and give you a clean and clear method.
Method 1: Plunging the Toilet
Tools and Materials: A Toilet Plunger, A Pair of Rubber Gloves, a Bucket of Water,
1. Make Sure the Toilet Doesn’t Overflow
Don’t flush again if your toilet doesn’t flush correctly after one flush. Additional water will be poured into the toilet bowl as a result of this. Remove the toilet tank lid and shut the toilet flapper properly. Extra water will not reach the bowl if the flapper is closed.
- The flapper resembles a round drain stopper with a chain attached to it.
- It’s acceptable to place your finger inside the container to seal the valve because the water isn’t filthy.
2. Get the Toilet Ready
If there is any spillage, lay tissues or paper, or rags on the ground to absorb the moisture. The paper makes cleaning simpler afterward. You should either open the window or use a ventilation fan to eliminate the smell.
- Put on a pair of rubber gloves if the blockage is severe. Bathrooms are filthy, but a decent pair of rubber wiping gloves will keep you safe from the bacteria that lurk inside. Select gloves that are long enough to reach your elbows.
- You might also like to slip on an extra pair of clothes in case it goes a little dirty.
3. See If You Really Can Remove The Impediment
If you see what’s causing the blockage, go in and attempt to erase anything from the commode. Avoid the plunge and move directly to some other approach if you can’t pick it up with your fingers but believe there’s something (as in a kid’s toy) creating the blockage.
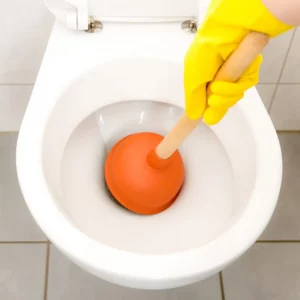
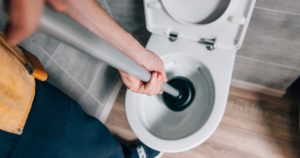
4. Make sure you’re using an elevated plunger to plunge a toilet
A big, thick rubber plunger, whether ball-shaped or by a wrap rubber flange on the base that forms a seal, is required. Will not use a compressed air plunger that is tiny and inexpensive. These are frequently ineffective. While using the plunger, run it under heated water. This will soften it and aid in the creation of a sealing.
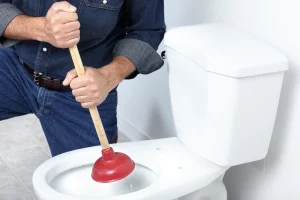
5. Plunge into the bowl using the plunger
Make absolutely sure the plunger fits the area entirely. To be functional, the plunger must be immersed in water. It is critical to push and draw water through the aperture rather than air. If necessary, fill the dish with water from the sink.
- Place the Toilet plunger over the hole and press down. Slowly begin, as the first dive will force air into the basin.
- To dislodge and disrupt the blockage, push down and then lift up quickly. Lift the water up and down with the plunger as much as you can till it drains.
- The toilet may take 15 to 20 cycles to flush. Patience is required. Plunging alone can frequently be enough if you’re confident there’s no solid item in the way.
- This may not function right away, but will eventually. It may not function right away, but it usually does after a few constant attempts and flushings, each including hundreds of plunge rounds.
6. Test the Drainage by Flushing The Toilet
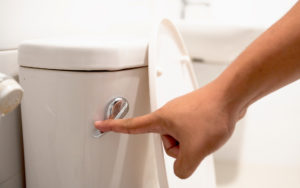
Once plunging ultimately empties the bowl however the blockage still prevents seamless passage down the sewer, removing the plunger and refilling the pan with water. Bring it up to the point where it should be after a typical flush, then plunge it once more. If you have persistent blockages, you may need to repeat the process.
Also, read- Most Powerful Flushing Toilet For Clean and Fresh Bathroom
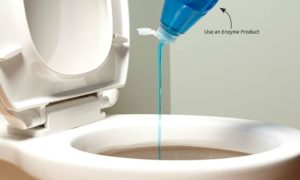
Method 2: Use any Enzyme Products
Tools & Materials: Waste Removal Enzyme, A Pair of Rubber Gloves
1. Purchase a waste elimination enzyme solution
Find a product that has a combination of waste-liquifying enzymes. Septic systems employ such enzymes to decompose trash. Products of this nature may generally be found in or around the piping section of hardware stores. Since enzyme waste disposal does not affect your pipelines or the ecosystem, it is superior to utilizing a drain-clearing agent. This technique is only effective on biological trash; it would not operate on toys or other things.
2 Observe The Package’s Directions
Fill the toilet bowl with the enzyme solution in the suggested quantity. Usually, you will indeed be told to wait longer for the enzyme to begin working on the blockage. Once the blockage has been removed, the toilet should drain normally.
Method 3: Make Your Own Drain Cleaner
Tools & Materials: ½ gallon of Water, 2 Cups of Vinegar, 1 cup of Baking Soda,
1. Half a gallon of water should be heated.
If the toilet clogs frequently as a consequence of attempting to eliminate too much trash, a solution of heated water, baking soda, and vinegar can typically replace a professional cleaning solution. Heat half a gallon of water, then set it to leave to cool while you finish assembling the toilet bowl.
- At least 50 percent water within a gallon is required. A tiny volume of water will not operate since the power required to drive through the blockage is insufficient.
- The water should never be warmer than a cup of hot tea that you can easily consume. This should not be boiling, as this might cause ceramics to break. You want to elevate the temperature of the water that is flowing through the blockage or pushing against it.
2. Fill the Toilet with 1 Cup Baking Soda and 2 Cups Vinegar
Baking soda and vinegar generate a chemical reaction that aids in the removal of blockages. Although purified white vinegar is frequently utilized, any vinegar will suffice.
- There will be a lot of fizz in the combination. If you will not have sodium bicarbonate or vinegar available, a couple of sprays of dish detergent in the toilet bowl would suffice. The soap may aid in the unclogging of the blockage.
- For blockages produced by a solid blockage, or by a toy, this approach is unlikely to succeed.
3. Fill the Dish Halfway With Boiling Water
Instead of pouring it from the rim, pour it from the waist level. The force of the water flowing into the bowl might aid in the clog’s removal.
4. Set Aside the Solution Overnight
The flood should have emptied before dawn. Clogs produced by organic debris should be cleared using this homemade drain cleaner. If the water won’t flush on the second try, the blockage might be caused by a hard object. Use a wire coat hanger or a drain snake to unclog the drain.
Method 4: Use A Plumbing Snake
Tools & Material: Plumbing Snake, A Pair of Rubber Gloves
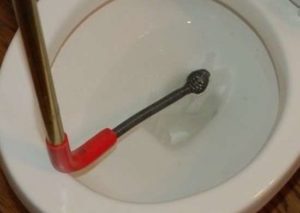
1. Get a plumbing snake or borrow one
A plumbing snake (also known as a “flexible cleaning tool” or “auger”) is an adaptable coil of wire which can “snake” around the bends of a pipe and reach depths beyond what a wire can. A “closet auger,” that is intended to remove toilet blockages to avoid harming or discoloring the bowl, is the ideal snake. A closet auger would most likely be used by a plumber.
2. Place one of the snake’s ends in the sewer
Push it down and send the snake farther into the pipe until you reach a blockage.
3. Rotate the snake and force it past the blockage
The aim is to part ways the blockage into tiny enough bits to pass it through tubes. Clearing the obstacle may require a few moments of maneuvering. Flush the toilet after the water has drained to determine if it drains as rapidly as it should.
4. Reversed snake
It could be required to take out the toilet and run the snake in reverse directions. This is particularly true in the case of hard blockages flushed by an inquisitive youngster. Contact a professional if the clog is proven to be difficult but you’re not confident about dismantling and changing the toilet.
Methods 5: Using A Wire Coat Hanger Through the DIYer method
Tools & Material: A Wire Coat Hanger, A Pair of Rubber Gloves, a Sharp Cutter, Rag/A Small Cloth, Duct Tape
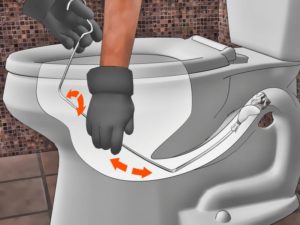
1. Align and untangle a wire coat hanger
First, you have to cut the wire straight in the middle to make it align and then wrap a cloth around the wire’s end. To hold the cloth in position, apply duct tape. This will keep the cutting tip from scratching your toilet’s porcelain. Only when there is a blockage during the first few centimeters of the drainage can the wire hanger approach work.
2. Insert the wire’s bundled end into the sink
To empty the drain, bend, press, and move the cable in a clockwise direction when it’s in the sewer. Press it against the obstacle if you really can feel it. Continue till the water starts to drain.
When you’re doing this, make sure you’re using rubber gloves. As you pull the cable about, you could be drenched. The clog should be out of range of the hanger if you won’t find it and the toilet won’t empty. To remove it, use the mechanical snake approach.
3. After the fluid has emptied, Clean the toilet
The barrier should be gone, and filthy water should be free to glide freely through the pipe. If the tank is still taking a long time to empty, the clog may have moved out of range of the hook. In this scenario, you’ll have to clean it out using a piping snake.
Method 6: Use a Wet or Dry Vacuum Cleaner to Plunge a Toilet
Tools & Material: Vacuum Cleaner (Wet or Dry), A Pair of Rubber Gloves, A towel
1. Purchase or borrow a wet/dry vacuum cleaner
If the plunge and snaking haven’t worked, attempt using a wet/dry vacuum. Use a wet/dry vacuum cleaner that can handle water instead of a regular vacuum pump.
2 Using the suction, remove the water from the bowl.
To suction away the blockage, the bowl has to be clear of water as well as other waste.
3 Place the suction hose’s tip into the drainage
Put it a few centimeters into the opening of the porcelain bowl. Instead of using an adapter, merely use the flexible structure. To form a seal all around drainage, wrap an extra towel around it.
4 Start the Vacuum Cleaner
To achieve a good seal, use one hand to apply pressure to the towels. Wait a few moments for the suction to kick in. It’s possible that the vacuum will be able to remove the obstruction.
Conclusion!
So, that’s it! We come up to the conclusion of this article where we explain all the information about “How to Plunge A toilet?”. The topic related to toilets is now in the mainstream but when you really need it, it’s come in handy. In this article, we tried our best to share every inch of information about unclogging a toilet with a Toilet plunger, and we did (hope so). So, if you like this article please let us know in the comment section below, and feel free to share your experience when you apply these methods to your toilet to unclog.
You may also read about- 7 Best No Clog Toilets Review- Buying Guide
FAQs
How to plunge a toilet with poop?
You can plunge into a toilet with poop. Just make sure that when you start plunging some part of the poop gets stuck in the plunger you need to remove that and carefully throw that in the garbage.
How long should I use the plunger in the toilet?
It would hardly take 10 to 20 seconds to clear the clogging in the pipe. You should do it till the pipeline gets cleared.
Why won’t my toilet unclog with a plunger?
To plunge you need more water than the air. You must ensure the proper availability of water and if still, this doesn’t work out you should try to go with the snaking process to clear the clogging.